
Windows 10 stopped getting free security updates on October 14, 2025, and the one-year paid extension runs out on October 13, 2026. So a lot of perfectly good PCs are now stuck with a message that says the processor is not supported for Windows 11. This guide covers the registry fix Microsoft itself documented, what to do when the MoSetup key is missing from your registry (the most common question we get), the other methods when that one is not enough, and the honest trade-offs before you do this on a business computer.
First, check whether your PC is really unsupported
Windows 11 needs a 64-bit processor on Microsoft’s supported list (roughly Intel 8th generation and AMD Ryzen 2000 or newer), 4 GB of RAM, 64 GB of storage, UEFI firmware with Secure Boot, and a TPM 2.0 security chip. Many PCs that fail the check actually meet every requirement; the TPM or Secure Boot is just switched off in the firmware settings.
- Press Start, type tpm.msc and press Enter. If it says “Compatible TPM cannot be found”, the TPM is either disabled or absent.
- Restart, enter the firmware settings (usually Del, F2 or F10 during startup) and look for TPM, fTPM (AMD), PTT (Intel) or Security Device. Enable it. Also enable Secure Boot and set the boot mode to UEFI if it is on Legacy or CSM.
- Run Microsoft’s free PC Health Check app again.
If the only thing PC Health Check still complains about is the processor, or it reports TPM 1.2 rather than 2.0, the registry fix below is for you. If the PC has no TPM at all, skip to the Rufus section.
The registry fix: AllowUpgradesWithUnsupportedTPMOrCPU
Microsoft published this method on its own support page for people who understood the risks, then quietly removed the instructions in early 2025. The registry value still works with the current Windows 11 installers, and it lets you do an in-place upgrade from Windows 10 that keeps your files, programs and settings. It requires at least TPM 1.2 and UEFI boot; it does not help a PC with no TPM.
- Back up your files first. An in-place upgrade normally keeps everything, but nobody has ever regretted a backup.
- Press Start, type regedit and press Enter to open Registry Editor. Approve the prompt.
- Paste this into the address bar under the menu and press Enter:
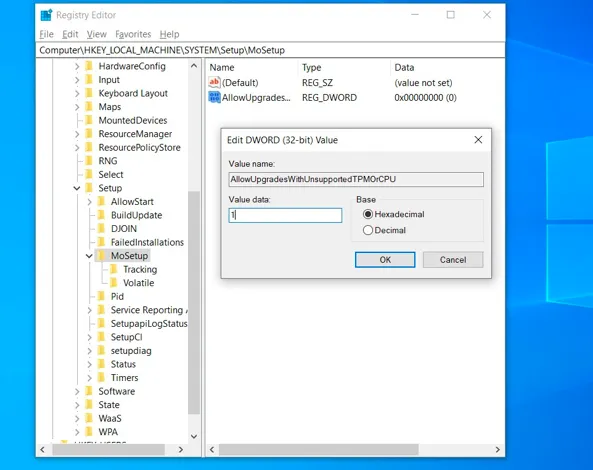
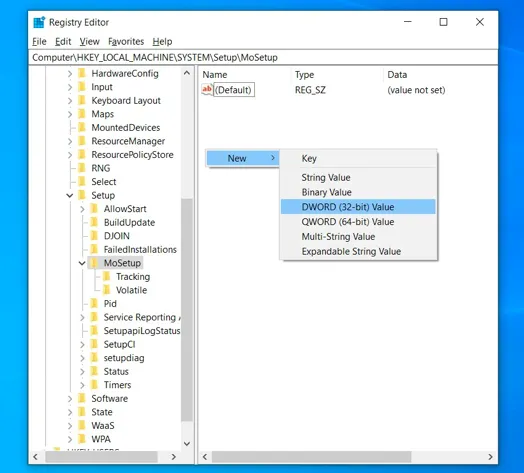
HKEY_LOCAL_MACHINE\SYSTEM\Setup\MoSetup - Right-click the empty area on the right, choose New > DWORD (32-bit) Value, and name it exactly:
AllowUpgradesWithUnsupportedTPMOrCPU - Double-click the new value, set the data to 1 and click OK. Close Registry Editor.
- Download the Windows 11 Disk Image (ISO) from Microsoft’s Windows 11 download page. Do not use the Installation Assistant or Windows Update; they run their own check and will refuse.
- Double-click the ISO to mount it, then run setup.exe from inside it. You will see a warning that the PC does not meet the requirements. Click Accept and carry on. Choose Keep personal files and apps.
MoSetup is missing from the registry? Create it
This is the point where most people get stuck. On many Windows 10 PCs there is no MoSetup folder under Setup at all, because Windows only creates it once an upgrade has been attempted. That is normal, and nothing is broken. Make it yourself:
- In Registry Editor, go to
HKEY_LOCAL_MACHINE\SYSTEM\Setup. - Right-click the Setup folder in the left pane and choose New > Key.
- Name it MoSetup (one word, capital M and S) and press Enter.
- Select it, then create the AllowUpgradesWithUnsupportedTPMOrCPU DWORD inside it as described above.
Two other things that catch people out: the value must be a DWORD (32-bit), not a string or QWORD, and you must run the installer from the ISO after setting it. If setup still refuses, check that the name has no spaces and that you are editing the registry on the PC you are upgrading, not on another machine.
No TPM at all? Use Rufus for a clean install
The registry value above will not get you past a PC with no TPM chip or a firmware that cannot do Secure Boot. For those, the practical route is a clean installation from a USB stick made with the free tool Rufus:
- Download the Windows 11 ISO from Microsoft and the latest Rufus from rufus.ie.
- Plug in an 8 GB or larger USB stick. Rufus will erase it.
- In Rufus, select the stick and the ISO, then click Start.
- In the Windows User Experience box, tick Remove requirement for 4GB+ RAM, Secure Boot and TPM 2.0. You can also tick the option to skip the Microsoft account requirement and create a local account; we cover the pros and cons of that in our local account guide.
- Boot the PC from the stick and install Windows 11 as normal.
This is a clean install, so it wipes the drive: back up first and have your program installers and licence keys ready. If you would rather not use a third-party tool, the same result can be had by pressing Shift+F10 at the first Windows setup screen and adding BypassTPMCheck, BypassSecureBootCheck and BypassRAMCheck DWORD values set to 1 under HKEY_LOCAL_MACHINE\SYSTEM\Setup\LabConfig, but Rufus does exactly that for you with fewer chances to mistype.
The one limit no bypass gets around
Since version 24H2, Windows 11 requires the processor to support the POPCNT and SSE4.2 instructions. This is not a policy check that can be switched off; without them the system simply will not boot. In practice that rules out Intel processors from before about 2008 and AMD processors from before about 2011. Anything from the last twelve years or so is fine, which is why the tricks above still work on most “unsupported” PCs.
What you are signing up for
Microsoft’s position is that an unsupported PC “isn’t entitled to receive updates” and that any damage is not covered by the manufacturer’s warranty. What that has meant in practice so far:
- Monthly security updates have continued to arrive on bypassed PCs. Microsoft has not promised that will continue.
- Yearly feature updates (23H2 to 24H2, for example) are usually not offered through Windows Update. You repeat the ISO upgrade once a year, with the registry value still in place.
- Some PCs show a “System requirements not met” watermark on the desktop and in Settings. It is cosmetic.
- Without TPM 2.0 you lose the hardware-backed side of BitLocker and Windows Hello, and some security features are unavailable. Older machines also tend to have older drivers, which is where most post-upgrade problems come from.
Should a business do this?
For a home PC, a spare machine or a workshop computer that runs one program, the bypass is a reasonable way to get a few more years out of good hardware. For the computers a business runs on, we usually advise against it. A machine old enough to fail the Windows 11 check is typically seven or more years old, its warranty is long gone, and if it holds customer data you are relying on Microsoft’s goodwill for security patches. If you need to buy time, the paid Extended Security Updates for Windows 10 are the supported way to do it for one more year (until October 13, 2026 for home users, up to three years for businesses), while you plan replacements. Our IT checklist and managed IT articles cover how to budget for that without doing it all at once.
Questions people ask us about unsupported PCs
Does the registry fix work on Windows 11 24H2 and 25H2?
Yes, as of this update the AllowUpgradesWithUnsupportedTPMOrCPU value still lets the ISO installer upgrade a PC with an unsupported CPU or TPM 1.2. Microsoft removed the instructions from its website but has not removed the check. That could change in a future release, which is one more reason to keep a backup.
Why is MoSetup not in my registry?
Windows creates the MoSetup key the first time an upgrade is attempted, so on many PCs it does not exist yet. Right-click the Setup key, choose New > Key, name it MoSetup and add the DWORD value inside it. It works exactly the same as a key Windows made itself.
Will I get Windows updates on an unsupported PC?
Monthly security and quality updates have been arriving on unsupported PCs so far, but Microsoft does not guarantee them. The yearly feature update usually has to be applied by hand by running setup from a new ISO with the registry value still in place.
Can I go back to Windows 10 if it does not work out?
After an in-place upgrade, Settings > System > Recovery offers Go back for ten days. After that, or after a clean install, you need your backup and Windows 10 installation media. Remember that Windows 10 itself is out of support unless you have enrolled it in Extended Security Updates.
Is it cheaper to just replace the computer?
Often, once you count the time. A bypass upgrade, driver hunting and the yearly re-upgrade add up, and an old machine is slower and more likely to fail. For a business PC that someone uses all day, a new Windows 11 desktop or laptop usually pays for itself; for a machine that is used an hour a week, keep it going. If you are in Surrey or Langley and want a second opinion on which of your computers are worth upgrading, we are happy to look at them.
Need a hand with Windows 11 upgrades?
We upgrade, replace and set up business computers across Surrey and Metro Vancouver, including moving your files, programs and email so nobody loses a day. Call 604-375-2629 or send us a message and tell us how many PCs failed the check.